Keeping Your Left Hand Relaxed: 11 Tips for Bass Players

Q: I met you several years ago at NAMM when I worked for Alfred Music and I filmed you when you played at our booth. Anyway, I have since switched careers from Video Editor to Massage Therapist and I still play bass – jazz on electric and classical on upright. Because of my involvement in the San Diego music scene, a lot of my clients are musicians. I have decided to dub 2016 as “left handed death grip” year. It seems like I get client after client of string players (not just bass) with left hand pain and tendonitis who all reluctantly admit that they are hanging on to the neck for dear life. Of course, I tell them to stop playing like that but I haven’t been able to find any resources to direct them to as to how to stop doing it. I was lucky in that an early teacher of mine was crazy about the left hand being relaxed but it’s hard to describe how to do it. I have enjoyed reading your posts on No Treble and I was wondering if you could address the left hand tension problem. I can’t seem to find anything adequate on this issue on Google so it seems like a problem that needs addressed.
A: Nice to hear from you, and thank you for the question. I am lucky in as much as I just naturally fell in to good posture and technique, so I’ve never had any issues with my hands. That said, I have plenty of students who have had issues and here are some things that I recommend.
- Never play through the pain. The “no pain, no gain” mantra absolutely does not apply when dealing with your hands and playing music
- For any persistent problems, see a physical therapist of some kind to get a medically informed opinion of how to best proceed and avoid further complications.
- If you’re action is more than a 1/4″ away from the fretboard, you might consider getting your bass professionally set up. Most music stores can accommodate, and it doesn’t cost that much.
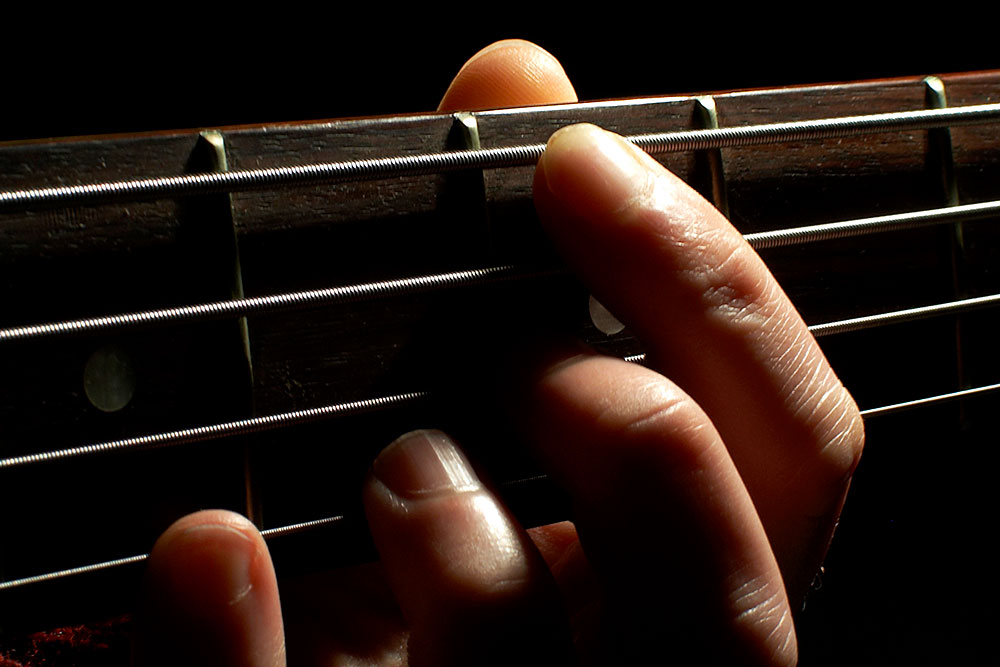
- Really explore how much pressure is truly necessary to play a note cleanly. I remember doing this as a young learner, and I’ve also read about the same process from Gary Willis. Press any note all the way down to the fretboard, pluck the string, now begin to gradually release pressure from the note until it begins to buzz. You only need slightly more pressure than that to get the note to sound properly. You can also do it in reverse by placing your finger on the note, plucking the string, and gradually increasing pressure until the note sounds clean (always fingering the note just behind the fret).
- Fingering and hand position: Look at the rest of your hand. I like to keep my thumb perpendicular to the neck (for the most part) and it tends to anchor just about where my middle finger is on the fretboard. This gives me a good pivot point which allows me to pivot my hand a few frets both left and right. If you hold your fingering hand out in front of you and pretend that you are holding a ball (say, racquet ball-sized), you’ll get the basic version of my plucking hand position. My fretting fingers are curved a bit, and I tend to play with my finger tips (80% of the time. My fingers will flatten out once in a while depending on the line I am playing but start with a good rounded ‘C’ shape in your fingering hand).
- Plucking hand position: The plucking hand position will vary greatly depending on your physiology, plucking style, etc. I have multiple positions based on the sound I am trying to create, for example. For a good, solid, general, two-finger plucking style (ala Jaco), pay attention to how you are anchoring the hand with your thumb. Make sure that your hand is supported by your thumb and/or where your forearm rests against the body. Practice playing lines slowly and watch your hand. If your tendons are standing out, your 3rd and 4th fingers are flying our to the side and your hand looks generally tense, then it may be a good idea to slow things down and really focus on your plucking hand. Take a simple pattern like a scale and play each note twice through the pattern. Start slowly and gradually build up speed. Keep your eyes on your plucking hand. Try and make note of when the hand begins to tense up. Now back off the speed just a hair and practice playing the pattern at that tempo, very consciously trying to keep your hand relaxed and fluid. Slowly increase tempo from there over the course of days or weeks, all the while forcing yourself to relax
- If you are an upright player, have your teacher evaluate your hand positions.
- Breathe! Don’t hold your breath when you play. Take some deep breaths before beginning and make sure that you are relaxed and breathing while you practice
- Watch your body posture. Try to keep your back straight and shoulders back. Keep breathing properly and don’t scrunch up anywhere in your body.
- Watch a ton of videos on Youtube and pay attention to how the pros look when they play. Emulate what you see but also make allowances for variation. One thing won’t work for everybody, so if it doesn’t feel right, don’t do it.
- Try and keep your wrists as straight as possible. You also don’t want them “bone straight”. We all have a natural curve to our wrists. Try placing your hands and forearms on the table while at a comfortable heigth. Turn your hands inward a bit so your arms are resting a bit on their sides. Notice how you have a slight arc to your wrists through your hands. Try and maintain that natural arc as much as possible. You can this may cause you to hold the instrument differently but a good technique and posture will make playing easier. Try playing with the instrument on your left leg vs. the right. Take a look at your posture. Make micro adjustments. Adjust your strap so it’s the same length when sitting as standing (if you practice sitting down). Basically, experiment holding the bass at a number of points left and right, up and down across your body and watch your posture in the mirror. Good posture often makes a lot of sense when you see it and you might even feel the difference immediately. Just explore positioning and try and correct anything that you notice in your habits.
The one thing that you will notice when you watch your favorite players and the best of the best: they are almost always relaxed (both physically and mentally). There are exceptions to the rule, of course, and I find myself wondering how certain musicians hands to go into spasm when I watch certain people play. But it is much easier to play well when you are relaxed both physically and mentally.
If you cramp up when you are practicing, simply stop and gently shake out your hands and arms. Take a few minutes to relax before getting back to it. There are a lot of muscles – both big and small – that need to develop in order to physically work an instrument comfortably. Give them time to grow and stretch and don’t try to force them to do anything they aren’t ready to do. Take it slow and listen to your body.
Although I never really warm up, I do tend to shake out my hands, massage them and get the blood flowing before a performance. Do whatever gets your head in the game mentally and don’t forget to warm up those hands in some way. Wether you rub them back and forth for a minute or run some scales.
Get the blood moving, breathe deeply and relax.
Have a question for Damian Erskine? Send it to [email protected]. Check out Damian’s instructional books, Right Hand Drive and The Improviser’s Path.

Hand cramping is due to the lack of oxygen in your system, and like the singer, you have to learn how to control your breathing in a systematic manner.
Reading this in 2021. Very helpful. Thanks for taking the time.