Mod Shop: Bridge Replacement
Upgrading the Lab Rat: Bridge Replacement
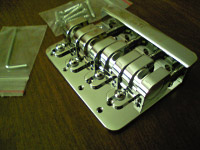 I have a bass I call the Lab Rat. It’s a really cheap Jaguar knock off I bought to experiment with some ideas I’d been kicking around. I’ve upgraded all the electronics already, and we’ll briefly go over some of that in future articles. I’m on to the hardware phase now, and today is bridge day!
I’m replacing the “economy” Fender-style bridge with a much more solid piece of hardware that is fairly new to the market, the Babicz Full Contact Hardware 4-string bass model bridge. This bridge is a direct replacement for stock Fender-style, 5-hole bridges.
 If you have any experience with these stock bridges – especially the ones that come on basses in the lower price range – then you know there’s a lot of room for improvement here. There are a lot of aftermarket options out there based on this design that are made with better metal, have more mass and will improve sustain and tone transfer.
If you’re feeling a little adventurous and don’t mind straying from the traditional look of this design, you can get even more mass, better contact from saddle to plate and saddles that stay where you put them. Have you ever had a saddle that starts moving from side to side when you really start to dig in? I have. Time to remedy that, along with some other issues this bridge presents.
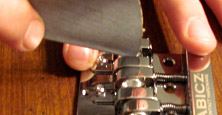 In this case, the swap is as straight forward as it gets. I did take one precautionary measure before getting started: the saddle edges were sharp enough that I was concerned about string breakage. If you find this with your bridge, you’ll want to round these edges off just slightly. A gauged nut file would have done the trick nicely, but I decided to come up with a method you can use if you don’t happen to have an expensive set of nut files in your tool box. A piece of wire hanger with sticky 400 grit sand paper folded over it turned out to be just the right diameter to match the radius at the bottom of these saddle slots. We’re not looking to remove a lot of material here, we just want to smooth the slot out enough so the string isn’t resting on a knife edge.
As you carefully sand with a sawing motion, rocking your “file” from front to back, you should see the sharp edge start to smooth out. That’s all you need.
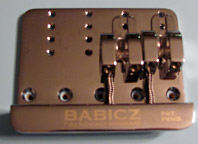 With that taken care of, the next step is to remove the stock bridge and lay the new one in it’s place to have a look for fit. You’ll want to remove some of the saddle hardware for access to the mounting screw holes. As you can see in my photo, the mounting holes line up perfectly. No issues here.
 Take a careful look at the supplied mounting screws (top) as compared to the ones just removed (bottom). The screws that come with the new bridge are flat top, as opposed to the dome top screws that were in the stocker. This is important because the dome top screws would interfere with the adjustability of the E string saddle. The supplied screws are slightly larger in diameter than the ones removed, so they’ll work in the existing holes with no modification.
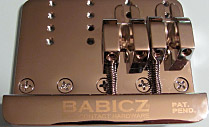 From here, it’s just a matter of screwing the new plate down and putting the bridge back together. I did measure the distance from the mounting screws to each saddle on the stocker before I took everything apart so I could get the intonation relatively close for a quick set up. When set up is complete, the saddles lock right down to the plate and they stay where I put them.
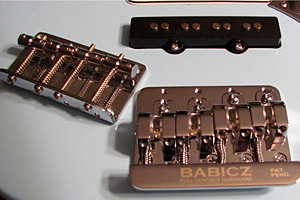 You can see here that this new bridge is quite substantial compared to the one it replaced. There is also a lot more contact area between the saddle and the plate. This combination of more mass and better saddle contact will, in theory, result in more sustain and better tone transfer from the bass body.
From a functional standpoint, these saddles are nice. Precise, accurate intonation and action adjustments are quick and easy and, with every moving part locked down, you should only have to do it once unless you change string gauges. As for the sound, I purposely put the same set of strings back on after the swap. I wouldn’t normally do this but I wanted to hear the difference this upgrade makes without changing any other factors. Right out of the gate, I noticed a difference in my tone. Not huge, but not exactly subtle either. It has a little more bite and a lot more of that woody kind of midrange punch you get when you dig into a solid bass. The fact that I can feel the neck resonate more now than I could before the swap tells me that my strings are, in fact, not losing as much of their vibration at the saddle. The sustain on this bass is markedly improved as well. Over all, I’m very pleased with the results and consider this a worthwhile upgrade.
This is a mod you can do on your dining room table with nothing more than a philips screwdriver (and the coat hanger and sandpaper, if needed). There are a lot of good quality bridges out there with plenty of mass that are designed to directly replace some of the more common bridge types. I chose the Babicz because I like the way the saddles are designed and I have a pretty crazy mod planned based on those saddles. But that’s something for a future column.
Next month, we’ll talk about the benefits of shielding your pickups and pots. I’ll show you one method that’s pretty easy and has always worked well for me.

This was exactly what i was looking for, thanks a ton!
I just got my new Fender Deluxe Bridge and I can’t wait to set it up, the only thing I’m worried about is the intonation.
Anyone got any protip for setting up the intonation fast and easy for a first timer?
@Toby
to get the saddles relatively close, measure the distance from the nut to the 12th fret, and make sure the distance from the 12th to the saddles is the same. for fine adjustments, hook the bass to a tuner and get an open string in tune. then check if the the 12th fret is in tune. if its sharp, pull the saddle back and if its flat push the saddle in. you want the open and 12th to both be in tune
Love this stuff! Looking forward to more “Mod Shop” articles!
Very cool. I have got a Leo Quan Badass II on my MIM J and it made quite the difference. I chose the Leo Quan based on styling even though it was quite a chore to track down. But it certainly did the trick, my bass has a much more aggressive attack and sounds quite unique.
Thanks Max for the tip
I’m interested in hearing about pup/pot shielding. this should be a great column
VERY COOL..
So…how does it Sound?
Also..Photos on the bass would be cool too..just one.
Great article! I actually replaced the BAII on my Modulus and with a FCH bridge and really did hear quite a difference for the better.
good article! now how do i adjust the intonation properly.. im a newb in this.. so please help ^_^
I think Toby laid it out pretty good in this thread Ampy. Just follow the directions he posted below and it’ll get you there.
how does this bridge compare the the leo quann badass 2 I notice the sadles are already filed for your strings. I’m looking for a new brige for my squire P bass but don’t want to spend a ton of money on the leo quan like I did for my american fender.
If you’re planning on changing the bridge on your Squier I’d also figure on changing the pickups. I put the Babicz on my PJ Squier and it made a world of difference…so much I added some EMG pups and it is now my main bass…I prefer it to my G&L. It’s light, has a great tone and as much sustain as I want.
I have a MiM JB fretless that I would consider upgrading. It has the stock string through bridge set-up now, what are your thoughts on switching to a string through body Babicz bridge? I would be able to drill out the necessary holes for the ferrules and mounting screws.
Rob, last I knew, Babicz isn’t making a string through body bridge but I have had good results with modifying my Babicz for a through body string set up, which now resides on my #1.
Thanks, this is exactly what I was thinking about doing. Picked up a Squier 5 string P bass because I liked the feel. Swapped out the electronics for Seymour Duncan pickups and pots.
Was looking for a bridge to finish the project.