The Buzz Killer: How To Shield Your Bass
This month, we’re going to talk about an all too common problem: the humming and/or buzzing you get from radio frequency waves interfering with the electronic signal in your bass.
These waves can be emitted from any number of sources, many of which are common on the stage and in the home. Neon and fluorescent lights, central AC and refrigeration units and old “tube type” computer monitors are just a few examples of the things that will cause audible interference in your signal, thus annoying you and your sound guy, ruining that home recording or just killing the mood when you’re in your favorite practice chair and trying to go to “that place”.
Some pickup configurations are more problematic than others. Passive circuits – especially those with single coil pickups – are most susceptible to interference. The other end of the spectrum is the all-active circuit which, in many cases, is all but impervious to outside interference.
Today, we’re going to look at one that took me by surprise. Long time friend and bassist Tim Bassett brought his fretless Spector to me for a minor repair. The electronics are essentially two separate circuits – a single, passive humbucker with passive controls and a piezo-equipped bridge with an active preamp. This set up should, by design, be pretty quiet, but testing this bass after the repair job brought a noise problem to light. I e-mailed Tim and asked him if he’d like me to look into it.
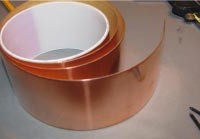 After making sure both coils in the humbucker were functioning and checking for faulty wiring and solder joints (these can all cause noise and should be checked first), I decided a shielding job was in order. This is a mod you can do inexpensively without permanently altering your bass in any way.
Here I use copper shielding tape, which can be purchased from Stew Mac. This tape has a conductive adhesive, which is important because you can slightly overlap all the seams and the end result will be, in essence, a one-piece shield.
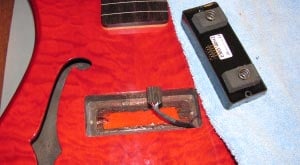 We’ll start with the pickup cavity. Lay a soft cloth on your bass to protect the finish, remove the pickup and set it aside. This one can be unplugged and removed completely, but most will be hard-wired and you won’t be able to move it very far. Be careful not to pull too hard on the pickup leads, as this will cause stress on the wires and connections and could cause a break in the signal path.
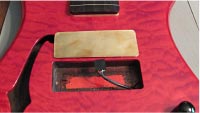 You can lay a piece of tape over the cavity and transfer the size of the opening by running a fingernail over the edges. Then, cut the transferred shape out with scissors and you have your bottom piece. If your pickup lead comes through the bottom of the cavity like this one does, just cut a slit in the tape so you can form it around the wire as you apply it.
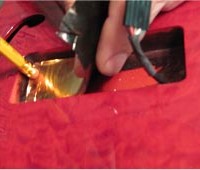 After carefully peeling the backing off the tape, line it up in the cavity and start to gently apply it. Start at one end and work your way across to the other. Use whatever tools you can come up with to aid this process. I have big fingers, and a brand new pencil eraser is my best friend here. It allows me to get into those tight corners and place this tape exactly where I want it. After you have the whole piece gently placed where you want it, vigorously rub it down with your finger and a pencil eraser to stick it down and smooth it out. If the cavity has rough imperfections like most do, they will stick out here. Be careful not to puncture the tape (or even your finger) on sharp protrusions. Before applying the tape, you can smooth these out by lightly scraping them off with a hand chisel, but this is not a necessary step. The effect is purely cosmetic, and you’re probably the only one who will ever see it.
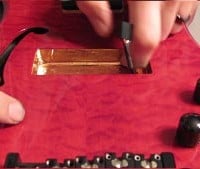 Now it’s time to do the sides. I like to do these in four sections because it’s easier to work one side at a time. Measure and cut the pieces so you can start just a hair below the top edge of the cavity and have the bottom edge overlap with the bottom piece you’ve already placed. Peel the backing and line the top edge up where you want to start it. Then work your way to the bottom seam, keeping the tape as smooth and wrinkle free as you can. When you get to the bottom, use your pencil to push that seam down tight into the bottom corner. You want nice, clean lines here and – more important – solid, void free contact at the seam. Pretend you’re trying to make it water tight (although, I wouldn’t suggest testing your results with actual water). Work your way around the sides, slightly overlapping all seams, until you have complete coverage. Now you have a cavity that’s completely lined with copper, but it’s not shielded just yet.
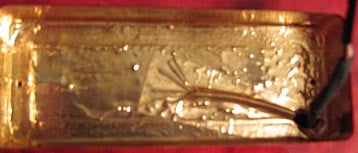 If you don’t ground this cavity, all the work you just did will have little to no effect. The method I use is to run a ground wire from this cavity to the control cavity and ground it there. Cut a piece of 22AWG copper stranded wire (this is the type most commonly used in guitar wiring) plenty long enough to get it where you need it to go and run it along side the pickup lead into the control cavity. Strip about a half inch of insulation off the end of the wire, splay the strands out like a fan and stick it to the bottom of the pickup cavity with more copper tape. Make sure you have enough clearance under the pickup for this so it doesn’t interfere with the adjustability of the pickup height. You also want to make sure any exposed wiring or metal pickup parts don’t come in contact with the copper. Most exposed metal on the bottom of a pickup can be grounded with no negative effect but this is not always the case.
Take a minute to isolate exposed metal on your pickup from your new shield with some good quality electrical tape. You’ve just performed a pretty amazing task and nothing will kill the afterglow like plugging your bass in and finding out it doesn’t work.
Now, re-install your pickup. If you’ve measured the pickup height before taking it out, then you can put it back in at exactly the same height and eliminate any guesswork.
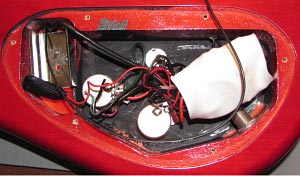 Ok, you’ve had your practice and you know what you’re doing. Now, carefully remove all the knobs and mounting hardware from your pots and switches and turn your bass over. It’s time to dig in. If you haven’t done this kind of work before, removing that cavity cover can reveal an intimidating sight. Don’t worry. Take a minute to familiarize yourself with what’s in there. You’re going to be moving all of this stuff around, so draw a diagram or label everything for re-assembly. If you’re not 100% certain you will remember where everything goes, just number every component, one through whatever, with small pieces of tape and then take a picture for future reference. Remember, taking a minute for precautionary measures now can save you hours of frustration later.
After removing all the necessary components (in this case, just a battery clip and four pots) and carefully pulling them aside to make room, you can now start shielding this cavity in sections. You should be able to pull this off without disconnecting any electrical components. I know how to wire up a bass (as many of you do) and I still never desolder connections or cut wires unless I absolutely have to. If you don’t know how to wire a circuit, there’s no shame in that but, if you start disconnecting things, be prepared to pay somebody’s bench fee to have it put back together.
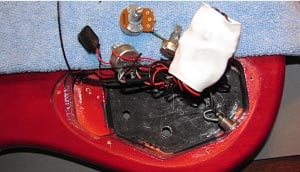 The black paint you see in this cavity is conductive. It’s been my experience that this stuff doesn’t work very well unless it’s properly applied with total coverage of the cavity. This is probably the main source of the unwanted noise in this bass. Using the same methods I showed you in the pickup cavity, start with the bottom and work your way around and up in sections. The corners and contours are more complex here, so take your time and be as neat as you can. When you’ve finished the exposed half of the cavity, move all the components over to the other side and continue. In this case, the inside of the cover already has aluminum tape on it so I want to bring the copper all the way to the inside lip of the cover rout. Then, when I screw the cover back down, this cavity will be completely encapsulated in one, continuous, grounded metal “container”. If the inside of your cover doesn’t already have some kind of metallic tape on it, just apply copper. Cover the whole inside surface and trim around the edges with a razor blade or an X-Acto knife.
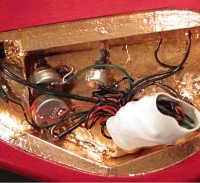 Now, with the cavity done, take your razor blade and cut out the holes for all the pots and switches. Be careful not to damage the holes in the bass body. Just use the hole as a guide and lightly cut the copper out of them. After all of this cutting and trimming out holes, there will be shavings and slivers inside this cavity. Take a few minutes to clean it out. Move the wires and components around to make sure you’ve inspected and cleaned every inch of the cavity. It doesn’t take much of a sliver to short out a switch or a pot, so you don’t want those floating around in there. Then, remount all the electronics and hardware.
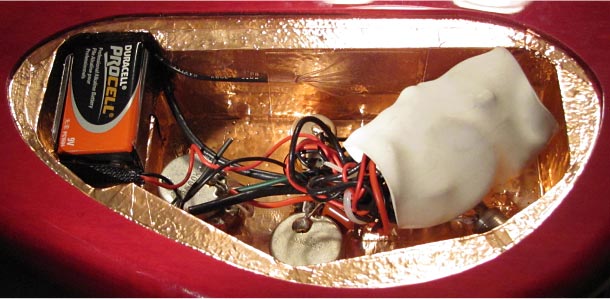
The ground wire coming from the bridge is soldered into the common ground for the whole circuit, usually at the back of one of the pots. Now, everything you’ve mounted back into the cavity makes the new shield part of that common ground. If you’ve grounded the pickup cavity in your bass, all you have to do is use the same method with this end of the wire you ran in here and connect it to this shield. Now, put this thing back together and plug it in. Play around. Stand in front of your computer or turn on the AC. If you had some trouble with noise, it should be greatly reduced, or even gone. Keep in mind, passive single coils are going to make noise. This method will bring that noise down to a manageable level. Passive humbuckers can often be brought to dead quiet noise levels, leaving your stage buddies wondering what kind of magic you’ve worked on your rig. Just don’t be surprised when they want you to fix theirs too and, when they do, remember it’s all for the greater good.
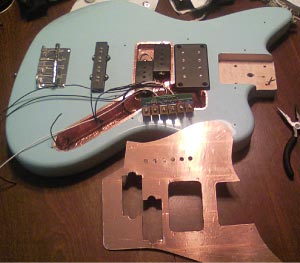 Here is a picture of my Lab Rat that illustrate how to shield a top routed cavity with a control plate and pick guard. The J pickup cavity is done exactly like the one I showed you up top. The rest has the copper coming up over the top edge so it will make contact with the shielded pick guard and the metal control plate.
This insures that all the switches and pots and as much of the pickup as is physically possible are nested in a sealed and grounded metal enclosure. Believe it or not, that J pickup is a true passive single coil and I can solo it in almost any environment. It hums a little but it’s barely noticeable and quite useable on stage. The P pickup and the humbucker are both dead silent.
Speaking of the Lab Rat, she’s getting some German tuners and a Hipshot. Stay tuned!




You guys should check out http://tone-guard.com to get metal pickguards that look great and function as shields so you don’t have to go through the long process mentioned above. Just switch out your guard and you’re ready to rock.
There is one possible issue that has been overlooked. By shielding several cavities, and connecting them to ground, it is possible to create excessive ground loops. Those will buzz worse than not shielding at all. The way to properly address this is to make certain all the shielding is connected to only one ground point.
Respectfully, Jordan, there is no substitute for proper shielding. Radio frequency happens in all directions, not just the face of an instrument.
taking a photo of the control cavity before moving anything can be useful for putting it all back
Terrific artical my two helpers in the shop received alot of information. Thank You, Blue Max Stringed Instrument Repair
This fixed the hum my G&L Jazz Bass having. Thanks for such an indepth article on the issue.
Great info. Thanks. I’ll try it on a couple of my Fenders. I “fix” the on stage noise problem by playing a Jack Casady model Epiphone … the low impedance pickup is completely noiseless, regardless of the lighting, et al.
Way to go. ZZ Top forgot shield theirs check out the end:)
https://www.youtube.com/watch?v=NUR2BQAwXE4&list=ALBTKoXRg38BBVDCxCcuWXtwZEqQuJNKSH
Does aluminum tape work as well?
Where in the main control cavity do you ground the copper stranded wire? Does it go to the common ground for the whole circuit, or just on the coper shielding in the main cavity?
“If you’ve grounded the pickup cavity in your bass, all you have to do is use the same method with this end of the wire you ran in here and connect it to this shield.”
can you use aluminum foil for this job?
I’m guessing that the conductive adhesive on that tape is conductive enough to work, but would there be any advantage to flowing solder on the copper seams? Also, what about adding pickup covers like the vintage fender ones, and if so, they need to be tied in to that same ground, right? One final thing: All of this shielding protects all the stuff in the cavities, but what about the pickup wires themselves? In many/most cases, there’s a small distance between the pickup cavity and control cavity where the pickup wires pass through a small hole between the cavities, and where there isn’t any copper shielding. So, would wrapping the pickup wires in copper tape be useful? It would be way more work since the pickup wires would need to be disconnected, pulled out, wrapped, and fed back through, but then the wrapped copper itself could be used instead of the wire to tie the cavities together to the same ground. Is anyone doing this?
I completed the steps and it sound good, but suddenly my bass stops working, it produces a minute sound while playing but nohing happens even if you turn up the amp and guitar knobs, help pls, what should i do? Is there a chance i shorted the circuit? If the shield touches the picknup metal parts? Can i still fix it?
I cant believe I was glad I didn’t have a grounding issue. Feel like crying. I’ve a gig on Saturday,my bridge is slipping like crazy and got told the babicz I bought to replace it won’t fit the bridge holes on my Japanese jazz and when I take my hands off the strings the damn thing howls it used to be so subtle but now I can barely hear the harmonics when I take my hand away!!! This task is way too daunting for my mechanical skills, some tech is going to be getting a lot of money off me. The things we do for love! Haha
Dude, thanks a lot for such a detailed article! I’ve had some doubts if I’d manage to shield bass but now I’m sure that it’ll be okay. Going to the store for a copper tape!